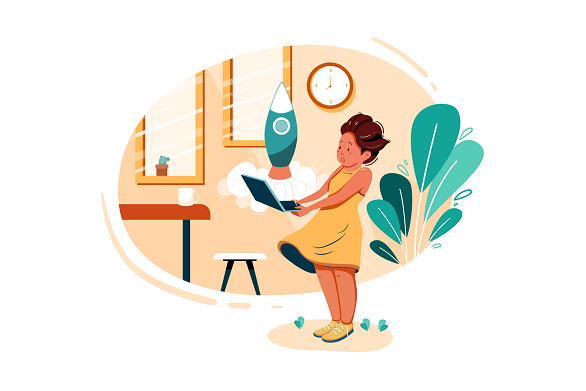
![How to Start a Blog that Makes Money [Ultimate Beginner Guide]](https://createandearn.com/wp-content/uploads/2021/03/Copy-of-How-to-Start-a-Blog-that-Makes-Money-Blog-s.png)
Choose a niche… choose and buy a domain… buy hosting… choose your blogging platform… choose a theme… keyword research…
I still remember how messy starting my first blog was.
Eventually, I found a blog post much like this one and followed it. But by that point, I had already bought my domain and hosting with a company that wasn’t delivering a proper service and had taken a few more steps that would prove to be a nightmare to redo.
It still felt like a relief to follow a proven and easy-to-understand guide.
So in this post, I’m going to help you take all the right steps towards starting your blog and avoid many headaches while saving time and money.
With this guide, you’ll also learn how to attract readers (traffic) and how to turn your blog into a passive income machine.
But before we jump into the practical guide, let me answer the most frequently asked question:
How do bloggers get paid?
The vast majority of bloggers get paid by ad networks that place advertising within their posts.
For many, this seems like the easiest way to earn from blogging, since they don’t know other methods, and all they have to do is fill in an application and cross their fingers once they reach around 100,000 monthly visitors.
Others have heard of affiliate marketing and sprinkle affiliate links (when someone buys something after clicking their link they earn a commission) all over their posts hoping for clicks.
As a digital marketer, I have a more complete picture of the possibilities.
In this guide, you’ll learn how to start earning from the first few blog posts you write.
You’ll wonder why more people aren’t doing this…
And the reason is simple. They simply don’t know.
Most of us wish we had a guide like this one to follow when we started.
So, let’s start your money making blog.
Some of the links in this post are “affiliate links.” This means that if you click on the link and buy something, I will receive an affiliate commission. This has no cost to you and I only recommend tools that I use or have used myself and that are within the most useful, to the best of my knowledge.
Step #1 – Choosing Your Niche

Most people starting a blog for the first time fall into one of these categories:
- Chose a niche they don’t LOVE and can’t get themselves to keep writing about (that was me with my first blog).
- Chose a niche they can’t make money with.
- Didn’t choose a niche at all.
What is this thing of a niche and why does it matter?
A niche is just the topic you’re going to be creating content (writing) about. And it doesn’t just matter, it’s the most important first step when starting a blog.
The right niche will set the difference between struggling to earn cents and getting a good part-time or even full-time income in no time.
Here are 5 factors to consider that’ll make this process smoother:
1. Passion

Your niche should be something you’re passionate about. Not just something you like!
You know when you’re so excited about something and you’re trying to talk to your friends and family about it and their attention quickly fades or they just give you a very faint “uhum”?
Well, that’s a subject you could create content around, with the bonus that the people who’ll read your blog will be much more interested than the ones you’ve been talking to.
You don’t need to be an expert on the subject, but you need to be willing to become one.
2. Profitability

If you ever want to earn a full-time income from your blog, you should make sure the niche you choose has a chance to be profitable without much effort.
The easiest way to monetize a blog is through affiliate marketing.
- Here, you’ll just make a list of products your target audience could use to achieve their final objective and find out if they have affiliate programs.
The easiest way is to just Google “name of the product ‘affiliate program’”.
3. Competition

Your next step is to check for competition. This might feel counter-intuitive, but existing competition is the validation you’re looking for, not the lack of.
Why’s that?
Because existing competition also tells you that there’s an existing audience.
If you want to write for yourself it’s probably cheaper and easier to start a diary instead of a blog…
Since this is a subject you’re already passionate about, there might already be a few blogs or influencers you follow.
Think of questions you’ve once Googled on the subject and perform that search again. If you follow this guide, you’ll be one of those search results soon.
Make note of everything you could think of that you’d like to say differently, better, or more of.
4. Your Special Touch

If you were worried about the competition earlier, this is how you’ll set yourself apart from the rest.
We’re all unique and that uniqueness gives us an advantage over everyone else at being us.
Find your unique perspective over this specific subject, or try to mix something else you’re good at with it.
A great example of this is the girl who created a fitness brand for petite women. She loved fitness but her size often felt like an obstacle.
Contrary to many, she turned this into an advantage. A unique selling proposition (USP) – her Special Touch. She shared her solutions to these problems with others and built a business around it.
What’s your Special Touch?
If you’re not sure or can’t come up with it right now, don’t overthink it. Just know that there’s something special about you and some people will benefit from your point of view.
The rest will come later.
5. Your Domain Name

Your domain name is the address people can type in their browser to land on your blog. Such as this one: createandearn.com
This will also be your brand and should communicate what your blog is about. However, contrary to your niche, you don’t want to be too specific here.
You might want to pivot your niche later on and it would be weird to be blogging about the ‘keto diet’ when your blog is called “veganrecipes.com”, for example.
A good name for both of these subjects would be alwayshealthy.com.
You also need to make sure your domain is available, so have a domain search open while you brainstorm your desired name.
Here’s one:
And here are a few things to keep in mind:
- Niche related but not too specific
- Not too long (I try to keep it at 2 words, maximum 3)
- Preferably take the .com extension
We’re going to see how to get your domain in the next section of this guide.
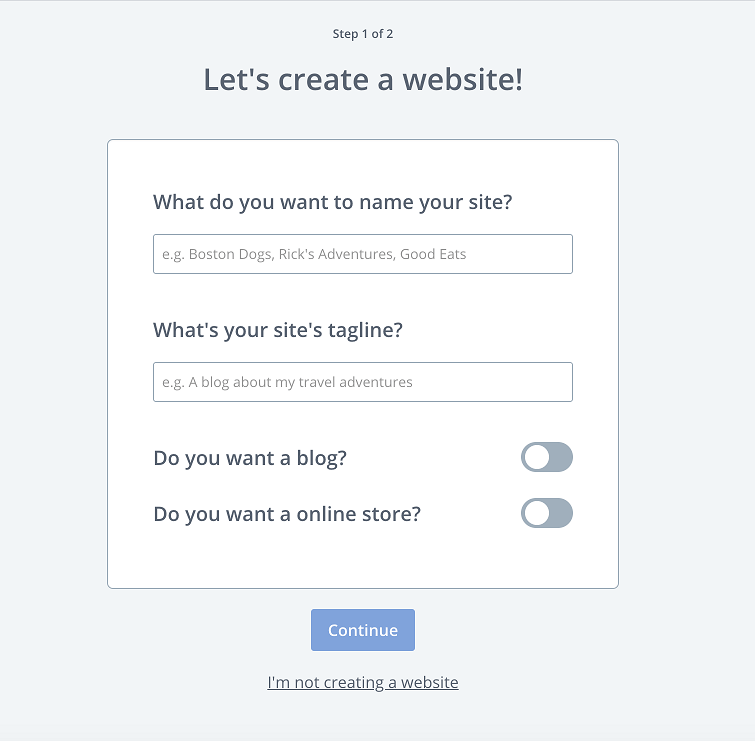
Step #2 – Launching Your Website
Getting your website online is one of the most exciting parts of starting a blog, but it can be a daunting and time-consuming experience if you get lost in the details.
I lost weeks learning and designing the website for my first blog. Not to mention that I bought a premium theme for over $200 I didn’t need.
The only real investment you need to launch your website is hosting. This is the virtual space you’ll rent to lodge your website.
Your domain name also has a yearly cost, but most hosting companies will give you the first year for free when you buy the hosting space with them.
After a few bad experiences, I ended up with Bluehost. This is the company I’ve been using for the past 3 years to host all my websites and domain names and I have no intentions of changing.
They have the easiest dashboard for beginners to navigate and great 24h customer service that always helped me figure out anything I couldn’t solve by myself.
You can get your domain and host with Bluehost here.
Once you’ve purchased this, launching your website with Bluehost is pretty much a 3-click process.
(If you’re really keen on designing a beautiful website, see this post on how to build your website.)
You now have a website on WordPress. This is the only CMS (content management system) I recommend starting a blog with.
Even though others like Wix or Squarespace might seem more integrated, the top priority of any blogger should be to be found.
WordPress powers up over 60% of the web and has everything needed to ensure your website is search engine friendly.
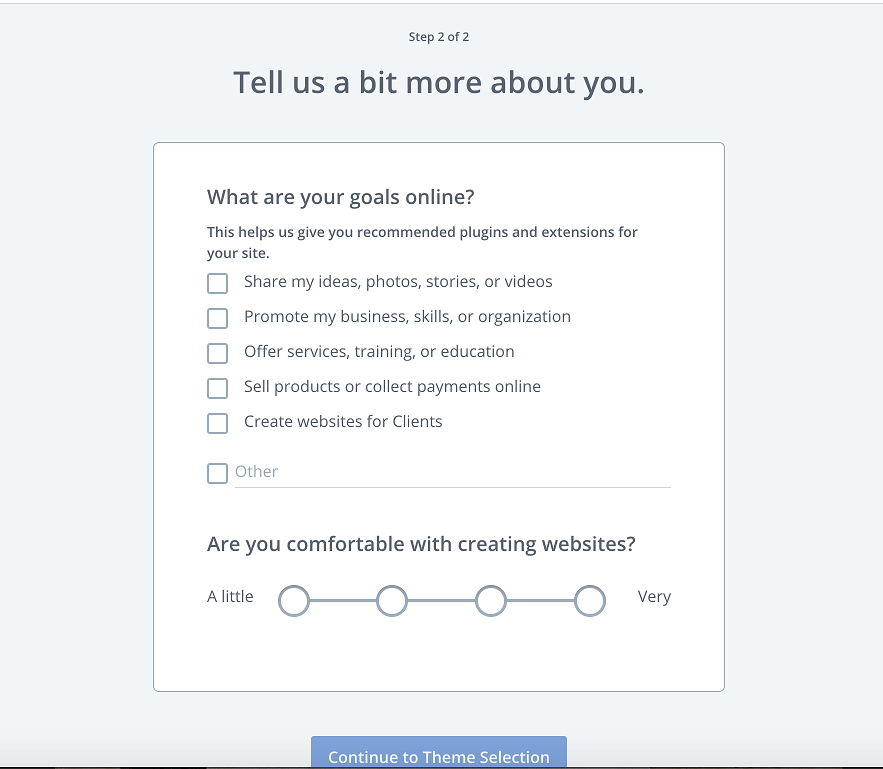
Step #3 – Setting up Your Website
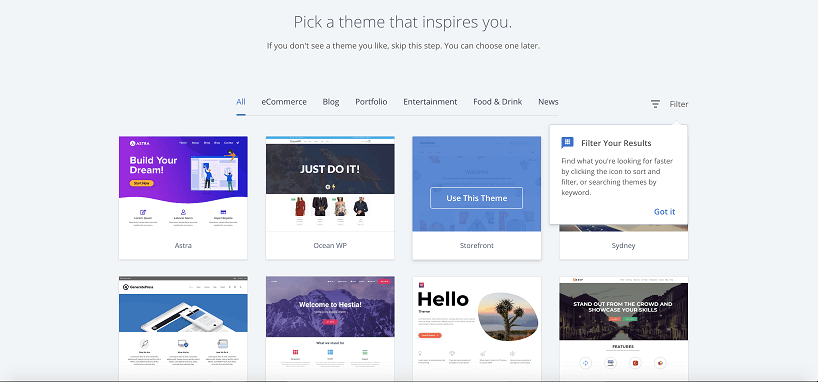
You don’t need any fancy themes or elaborate design. I recommend just leaving the default theme for now.
The reason is simple. You’ll be attracting people directly to each blog post, very few will even see your home page. And your blog posts are the least affected pages by your website’s design or theme.
Most of a blog post’s visual effect comes from the way you structure the text and graphics you use, which is done within each post.
Blog Structure and URLs
Contrary to the design which is usually overhyped, there are some very important aspects of a blog that are very often overlooked.
Setting up your permalinks will allow Google and other search engines to understand your blog better, what it’s about and how to deliver it as a search result.
These will also look much better when your posts are shared.
Go to ‘settings’ > ‘permalinks’ and you’ll want to change the URL structure to ‘post name’.

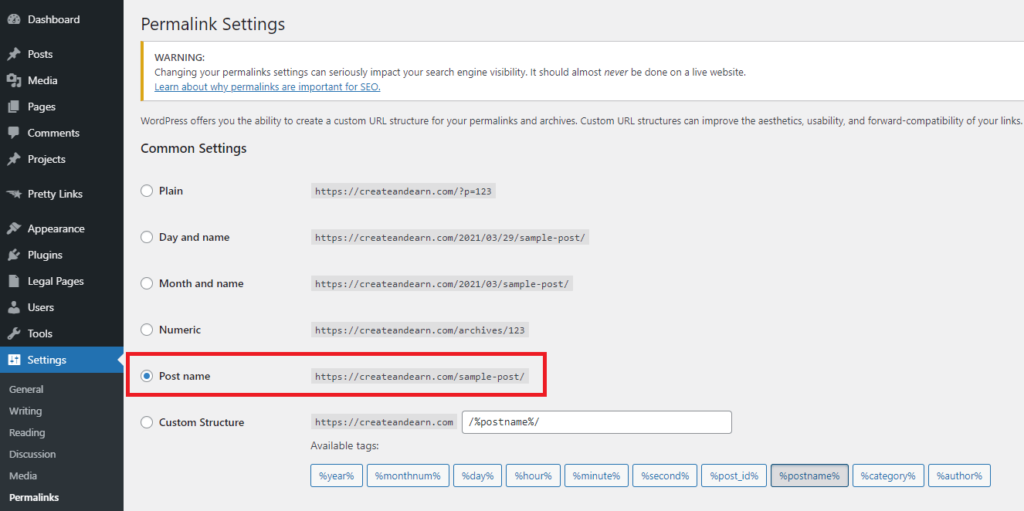
This will show each post’s URL (the link to navigate directly to a certain page/post) as ‘yourdomain.com/title-of-that-post’. As opposed to ‘yourdomain.com/?p=4312’.
Having a good URL structure is an important SEO (search engine optimization) step and will help you show up in Google searches and other search engines.
Essential Plugins

These allow you to incorporate tools or functionalities onto your website without coding.
Due to WordPress’s popularity and since it’s an open-source platform, anybody can create a plugin for it.
There are plugins for everything you can think of.
With time, you’ll learn to look for a plugin every time you want to add something to your website. However, I advise you to keep it to a minimum to ensure that your website loads as fast as possible.
Here are the ones I currently have installed on this blog and find essential:
Anti-Spam Bee – This will stop the spam bots from commenting on your posts. Before I had it I was deleting 10s of comments almost daily.
Gutenberg – This is a friendly block editor to manage the look and feel of your blog posts. (I’m not sure if it’s installed by default at this time).
Insert Headers and Footers – With this plugin, you’ll be able to add code to your header just by copying and pasting without messing with the actual code of the website and not risk messing up anything.
It’s very easy to use and it’s needed every time you need to connect an external account to your website, such as Google Analytics or Pinterest.
Pretty Links – To create (and track) shortened and simpler links to any page based on your branded domain.
This will be extremely useful for the long and messy affiliate links to the products you’re promoting. You can just introduce your affiliate link into Pretty Links, choose how you want it to look, and share it wherever you want.
Example: createandearn.com/bluehost is a shortened URL I created for my long Bluehost affiliate link, which originally looked like this: https://www.bluehost.com/track/francall/
Pretty Links also tracks the number of times people click on your link.
Smush – You want your website, and especially your blog posts, to load as fast as possible so you don’t lose any visitors. This plugin will compact the size of all your images without reducing their quality to ensure load speed.
UpdraftPlus – Backup/Restore – Easily backup all your website. You should do this often.
WP Legal Pages – Those pages you need to have on your website but no one knows how to write… This plugin generates them for you with one click.
WP Super Cache – “Very fast caching plugin.” It helps to keep your site running quickly and smoothly.
Yoast SEO – A Search Engine Optimization wizard. The best one I’ve ever tried.
Following most of its recommendations will ensure your blog is as search engine friendly as possible to get you positioned in those search results.
Here’s how to install your plugins:
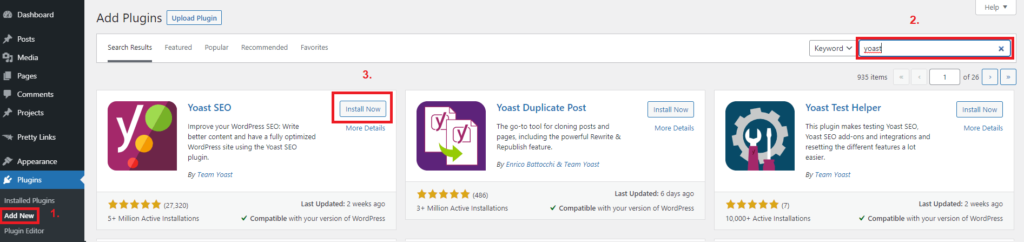
When installed, click ‘Activate’.
With these, you should have most of the functionality you need for your blog, covered.
Remember to keep only the plugins you’re using. Delete the ones you’re not using.
Step #4 – Start Blogging

Alright, your new website is online, set up correctly, all you need now is to start writing some blog posts.
But before you start writing stuff that no one’s ever going to read, like me and many new bloggers did, let’s talk about what brings people to your blog.
Think about the last few articles you read online.
How did you find them?
What kind of articles were they? News? Tutorials? Reviews?
How did you find the guide you’re reading right now?
Chances are that you typed a search in Google and found it.
Many people recommend sharing your blog posts on social media. I find that a waste of time. You’ll reach very few people and barely any will even be interested. But most importantly, those social posts disappear very quickly from view and don’t generate a steady flow of traffic (visitors).
The only exception to this is any social media with a search aspect, such as Pinterest or Quora. (More on this later).
My traffic comes mostly from search engines. Once you get to those top positions, people will find and read your posts daily and for a long time. Often years. And most importantly, those visitors are interested in what you wrote. They searched for it.
So how can you get your posts to be displayed as search results, preferably the top ones?
It’s easier than people make it sound and I’ll make it even simpler:
Answer people’s questions. If you have the best answer, you’ll probably get the top position.
Yes, Google is that good at understanding what people want to know and who’s giving it to them.
So what are people looking for in Google and its smaller siblings?
You can find that out easily by doing some “keyword research”.
Keyword Research

This is the process of finding what people are searching for in search engines.
What questions are they asking Google?
Do you have a good answer to any of those questions?
If you don’t, are you able to find it?
That’ll be your blog post.
There are countless tools for keyword research, some better than others. I’ll share some with you shortly, both paid and free options.
But first, let me give you a strategy to follow that will ensure your posts rank faster in search engines and keep this process simple.
Keyword Strategy

One of the most important factors that search engines consider these days to position a certain blog post is the website’s authority.
If you’re just getting started, your authority in the eyes of Google is 0.
But there’s a way to gain authority fast.
By focusing on a very specific topic and only creating content around that topic. These are called “content clusters”.
You’ll start creating one cluster of content and keep building upon it until Google starts ranking your posts.
But how can you pick that topic?
There’s a way that will not only rank your posts quickly but get you to start earning an income with your blog with the first few 100 visitors.
Remember that list of affiliate products you made earlier?
Pick one of them. The one you think you can write the most about, and that’s what you’ll enter in your keyword tool search bar.
Keyword Research Tools

AHRefs is the best tool in the market, but it’s also overpriced for anyone starting out.
A great way to take advantage of its power without bearing the monthly cost is to take their 7-day trial for $7.
I’ve done this in the past. AHRefs is such a powerful tool that in a few hours you can get a list of keywords to create content every day for a year.
You can then download that list to a spreadsheet and cancel your account.
A keyword list such as this is worth much more than those $7.
Ubersuggest is now a freemium tool, which means that you can perform 3 searches per day on it for free, with the option to pay for unlimited access.
The 3 daily searches synergize perfectly with that initial list from AHRefs. If you’ve only used the trial version to make that initial list you can’t go back in to update it, but you can use Ubersuggest.
Keywordtool.io also works with a freemium method but instead of locking the number of searches, it only shows the competition and search volume to the first few results in the free version.
You can perform as many searches as you wish but won’t have the full picture of the value of each keyword unless you get the pro version.
Google Keyword Planner is a free tool offered by Google to advertisers. You can have access to it by creating a Google Ads account. You don’t need to run any ads, simply to have an account.
This one works well with Keywordtool.io because it gives you an idea of the search volume for each keyword.
I usually input results from Keywordtool.io into Google Keyword Planner to get more information.
Keyword Validation

Finally, Google Search Results are probably the best free tool to validate any of the keywords you’ve found previously.
By performing a simple search, you can see which results Google is displaying and use the power of their suggestions.
Keep in mind that you’re trying to rank in Google, the most valuable information is the one that you can get directly from the source.
Here are a few things to look for in a Google search that will give you valuable information when deciding what to write about:
Search auto-complete suggestions – Once you start typing a search, Google will suggest some of the most common searches (search volume) other people are performing.

Search results – From these, you can have an idea of the authority of your competition.
If I’m writing about “How to Rank in Google” and all the top results are dominated by big names like Search Engine Journal, Neil Patel, and Brian Dean, I won’t even try to rank for that keyword.
I’ll try something more specific, also called a “long(er) tail keyword”, like “How to Rank in Google with a New Blog in 2021”.
Long-tail keywords have lower search volume, but you’ll have more visits as a top result for one of those than on page 20 of a high volume keyword.
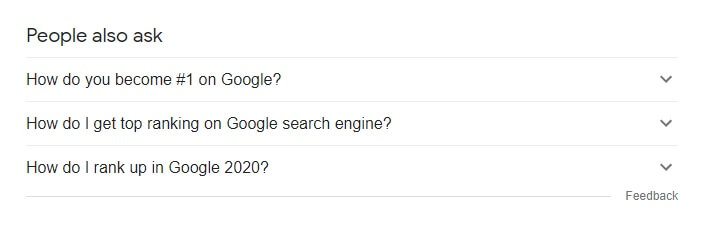
People also ask box – This one’s great to help you structure your blog post.
It shows you other questions people have around the same subject. The more of these you can answer within your post, the more chances you’ll have to draw Google’s attention.
Just make sure they make sense within the original search.
Following the previous example, you could answer the question “Can you pay Google to rank higher?” within the original post of “How to Rank in Google with a New Blog in 2021”.
Bonus Step – Promoting Your Content

If you follow every step in this guide, your posts will start ranking in Google sooner rather than later. But Google’s sooner is still over 3 months for a professional search engine marketer creating a lot of content.
So what can you do to get visitors earlier?
Even though I don’t promote my posts much, there are still a couple of places I like to do so and which help me a lot with any new blog.
Promoting every post you write in the places I’m about to share will also greatly boost your authority.
Pinterest is also a search engine, but with a social aspect. Other people can follow you and repin your pins (which link to your posts).
And if you’re lucky enough to have one of your pins repinned by someone with a lot of followers, your pin might go viral.
This happened to me with my first blog. The 4th post I ever wrote went viral on Pinterest and topped the 1,000 daily visitors. That pin is still driving traffic to that post today, 4 years later (less of it though).
Make sure you have a dedicated Pinterest account for your blog (make it a business account) and that you create at least one pin for each post you write.
I can’t get into details on how to use Pinterest in this post, but here’s a little hack:
The Tailwind app is a Pin scheduler but it has an amazing feature called Tribes. You can join a Tribe with thousands of other people that will see your Pins, and probably share them.
You can get a free trial of Tailwind here!
Quora
Here’s another search engine with a social aspect or vice-versa.
Anyone can go on Quora to ask questions and the community will answer. You can also answer other people’s questions.
Anytime someone asks or looks for an already existing question, your answer can show up.
Promoting your blog on Quora is easy, but don’t overdo it.
Create a profile that details your interest in the niche you’ve chosen for your blog and your expertise. Quora will then start sending you questions you might be interested in answering.
Initially, you can perform a search on the subject of the blog post you just wrote.
If you find a question that your post answers, don’t just link to the post. Write a short answer to that question in Quora and then link to the post at the end to those who want to dig deeper.
Conclusion
There’s a lot to starting a blog. But when you follow a proven step-by-step plan, the journey gets much easier, faster, and enjoyable.
Most people can’t get their first blog to work because they don’t understand the process until they’ve been through it and failed a couple of times.
It happened to me!
I hope that this guide will help you skip the blog that fails and jump straight to an extremely successful one.
After you’ve done all these steps, everything becomes way smoother.
All you have to do is set aside a few hours from your schedule, pick one of those keywords you’ve listed, write a post and publish. Rinse and repeat as often as you can.
I know there’s a lot of information here. My advice is to bookmark this post (or pin it to a Pinterest board) and come back to it until you’ve concluded all the steps in your new blog.
Feel free to ask any questions you might have in the comments below. I’ll answer them all!
![Email List for Affiliate Marketing [Complete Actionable Guide]](https://createandearn.com/wp-content/uploads/2019/07/Email-List-for-Affiliate-Marketing-Blog-Banner.jpg)
![Ideal Client Profile to Start a Business [A Beginner Friendly Tutorial]](https://createandearn.com/wp-content/uploads/2018/12/Ideal-Client-Profile-to-Start-a-Business.jpg)

